| INDEX
Production of presentation slidesPaper originals: Paper originals are best reproduced on a flat table covered by a clean (!) glass plate. The camera must be mounted in such a way, that the film plane is parallel to the plane of the paper, i.e. the focal plane. Depending on the size of the original use a standard fix-focal lens for larger formats, or above a magnification of 1:4 (original < 144 x 96 mm) use a macro lens. In a standard situation the distance of lens to object is much larger than the distance from the lens to the film plane: the lenses reflect this imbalance with an asymmetrical distribution of the optical elements in the lens. This asymmetrical arrangement is less pronounced in macro lenses and for the 1:2 - 2:1 range even some specialized auto bellow head-lenses are available, which are fully symmetrical (e.g. OM 80 mm automacro with specific f = 170 mm close-up lens). Never use diopter close-up screw lenses as they distort the picture. Fix-focal lenses have a superior optical quality than zoom-lenses. If possible, use a long focal length (80-135 mm) in order to minimize distortion. The illumination should be even and not differ more than 0.5 f-stop over the whole area of the original. When using tungsten light, it is checked with a hand held light meter oriented perpendicular upwards in respect to the plane of the original; distance of the light source as well as its angle may need adjustment. With flashes the correct position may be found using a Minolta flash-meter or may be guessed. -- Note: consider the scattering angle of the flash, the law incident angle of light = reflected angle for the glass plate, and the collection angle of the lens in order to avoid reflection on the glass plate. -- Use the neutral gray card for the correct exposure reading. B&W originals: When taking a picture of a black and white original, the contrast can be influenced by the exposure time, the processing of the film, and the film type used. For half tone originals use either the Agfachrome Scala or the Kodak Precision Line LPD4 (unsensitized, still produced ?) or as an alternative any colour reversal film. If an inversion of the picture is desired, then use a B&W negative film (not a color print film, except for the Kodak Vericolor Slide SO 279) Good graph work such as laser prints can be photographed with a half-tone film. However, the smallest irregularity will be shown on the slide. When using collages, the use of a lithographic film is imperative (Ectagraphic HC Slide, Kodalith Ortho, Agfaortho 25). For the precise alignment of elements on a paper it is convenient to use graph paper. The graph paper must be white with either blue or red lines, no black lines. The background is made the same color as the lines, using a strong blue filter for blue lined graph paper, and a strong red filter for red lined graph paper. The background will now have the same gray value as the lines, i.e. they are invisible. As the background is lighter than the black lines, it is perceived as being "white." Color originals: Use any color slide film; check for color balance and adjust if necessary. No specialized techniques are available. For reduced contrast use a slide duplicating film, to increase contrast use a Kodak Photomicrography or the Kodak Aerial film (still produced ??) or any High contrast film. KC films are a little reddish, Ektachrome films tend to be bluish, Fujichrome films have a green tinge, the Fuji Velvia (T-crystal technology) is a HC film with good color balance, Agfachrome is very neutral in color balance and shows a low (true) contrast and color saturation. Slide duplicating Diazzo Slides and Vericolor Slide SO-279:
The famous "blue slides" Interesting effects can also be achieved by color originals photographed
on SO 279. Black lettering on yellow background will turn into white
lettering on purple background. Multiple colors can be realized
as well, but will take some fiddling to get the colors right. With
the advent of color ink jet printers and color laser printers, this
will be a reasonable alternative to computer file output on a slide
maker, such as Polaroid's digital palette (see below). However,
if you have access to a color printer, why bother to use SO 279,
if you can photograph with a regular slide film from a straight
color original? One further possibility is to use regular B&W negatives of half tone films or preferable of lith films and put an additional colored foil in the slide mount, or color the slide with overhead pens: multiple coloration is possible. Occasionally one might like to use pre-formed masks in order to focus on a certain aspect of ones talk. These are available in a multitude of shapes and also as series of masks, so-called zoom masks. Supplier is e.g. Jedam (fax 09 81 - 18 07 222). Back to top of page & index. 
Computer file original 
3D-objects Lateral view:Although a top view is generally preferred, it might be necessary to take side view pictures of objects. In order to make the background color change softly, place the objects on a large area of either paper of fine cloth, which will be pulled up gently in the background; avoid sharp lines on the background as illustrated in the top two panels. Use your imagination to solve problems; your specific needs won't be described in any book ! The illustration below shows some commonly used arrangements; the camera is labeled with a purple C and the light source is marked in yellow. 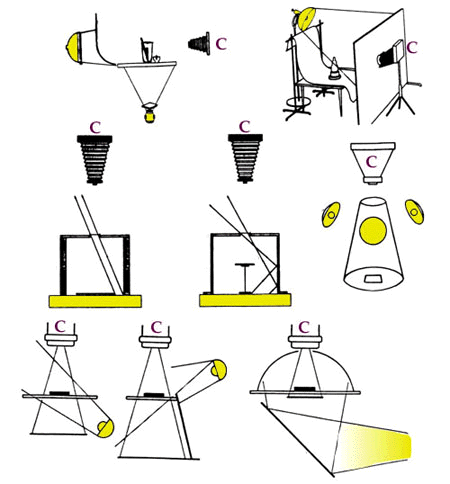
Shiny objects are causing special problems because of reflections. For non-metallic objects, a polarization filter can reduce the top lights. -- Note: If your camera (e.g. Olympus, Pentax, Leica) requires a circular polarization filter, you must use one, otherwise the exposure meter will not function properly. For cameras which support a linear pol-filter, a circular can be used; however they are more expensive. -- A cone made of white paper may be used in order to minimize reflection on metallic objects, as shown in the figure above in the middle right panel. However, "white" paper is not white and will cause some alteration of the light color, usually towards the blue-magenta. For critical shots you may have to do an unfiltered test shot, which you will view on a 5000 Kelvin calibrated light table/x-ray viewer. Then overlay the slide with (gelatine) color correction filters until the color balance is right. Next you retake the specimen with the same settings but with the color correction filters between the lens and the object. Ring flashes are often sold for the specific purpose of shadow free illumination. However, they are usually not strong enough, still produce strong vertical shadows and cannot be used in higher magnification macro shots as they will nicely illuminate the area surrounding the specimen, but not the specimen itself. Additionally, due to their limited application they are rarely used and represent unused equipment. I prefer the paper cone method over ring flashes, as I can utilize my normal flash for this purpose. An other, somewhat more elaborate method is illustrated above in the bottom right part of the graph. The light cone is replaced by a half dome with an opening for the camera lens. The specimen is placed on a glass plate, under which a suitable background is placed. From the side a light source brings light to a mirror at a 45 degree angle. This mirror reflects the light upwards, which will be reflected on the half dome. The problem with the change in color temperature due to the half dome are as for the transparent cone. However, an even, shadow free illumination can be achieved with a single light source. --- Note, that at high magnification macro shots (> 5:1) a regular flash without paper come gives surprisingly even illumination.
Photography through glass and water Properties of glass and water. Two properties have to be distinguished: Reflection and Refraction. Reflection is the back scattering of light off the surface into the hemisphere from where the light was emitted. The angle of reflection is equal to the angle of incidence. Refraction is the bending of light due to the passage of light through the interface of two media of different densities. As we usually have the light source in air and the subject behind glass or under water, the bending of the light is towards the line at a right angel to the surface of the glass/water, i.e. the lens axis (see below). Distortion is caused by the unevenness of the surface and in the case of glass, by the inherent variability in the thickness of the glass. Distortion can be minimized by one simple measure: keep the film plane parallel to the glass or water surface. Hereby the unevenness of the surface, and also the thickness of the glass plate is minimized. Reflection We can calculate or guestimate the position of the light source (e.g. flash), where no reflection off the glass/water surface should occur, from the following parameters:
Let me discuss the last three of the variables. 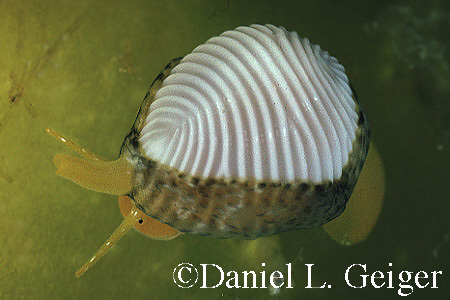
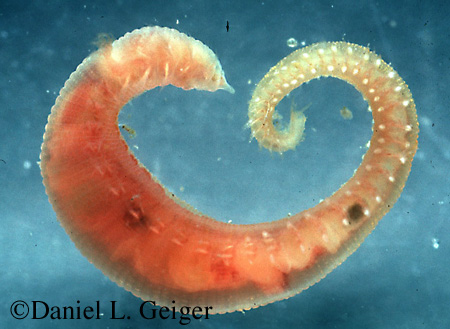
If your object is close to the surface of the glass (i.e. reprophoto of paper original), then a slightly longer focal length (100-150 mm) is advantageous as the light source can be placed at a steeper angle and unevenness in illumination across the surface is minimized. However, if your object is a fish in an aquarium, move as closely to the glass of the aquarium, i.e. try to use the shortest focal length suitable for the subject; possibly even put the filter ring flush against the glass: by this method the angle of the light source becomes irrelevant, as no reflections can bounce back into the lens. Additionally, any scratches in the glass, and other irregularities will be as much out of focus as possible. However, if the picture appears blurry through the viewfinder of the camera, chances are close to 100% that the picture will be entirely unacceptable; don't hope for mitigating effects. Despite all the considerations given to minimize the effect of glass and water, the surface may be too dirty or uneven to allow successful photography. It will also have become clear that the use of a lens hood in such traditional indoor situations is a necessity. The above example shows a relatively small snail (approximately 10-12 mm shell length) taken in a small aquarium through the water.
It becomes clear that with increasing scattering angle of the light source, it must be positioned closer to the glass surface. Typical scattering angles for electronic flashes are 60° illuminating a the viewing field of a 35 mm lens, with wide angle attachment 90-100° for a 20-21 mm wide angle lens, with tele extender it becomes more narrow and equals the collecting angle of the lens of equal focal length (see table on the left). These indications only apply if the flash is mounted on the camera itself. Moving closer makes the illuminated field smaller, and vice versa. It may seem that the relative flat illumination of the subject particularly in aquaria will be a problem, because we need to hold the flash at an angle and away from the lens axis. As it turns out this is not that much a problem as it may seem. As the light is refracted at the air-glass interface and also at the glass-water interface, it is bent towards the lens axis, i.e. although the flash is held at a strong angle, which usually would produce strong shadows, the illumination of aquarium shots is surprisingly even. You may also think about multiple light sources, but the technical requirements become cumbersome, and you will become a nuisance in a public setting. It will also have become clear that one of the key requirements for successful aquarium photography is a synchronization cord and a detachable flash, both preferentially TTL, because estimating-let alone calculating-the appropriate f-stop and flash setting is virtually impossible. If you have a built in flash, you MUST turn it off. Do not settle for a flash with less than metric guide number=32 while using a ISO 100 film. Neat Tricks
A second, interesting use is the perspective control or shift lens in outdoor photography. These lenses can separate to a certain extent the controls of the setting of the focal plane and that of the area photographed. Usually, when changing the composition of a shot, you automatically will also change the orientation of the focal plane. In case of architectural shots, where shift lenses are most commonly used, one cannot be at the vertical center of building but has to tilt the camera upwards, resulting in convergent lines. With a shift lens, however, the convergence can be corrected, or at least ameliorated. The same also applies to landscape photographs. On a separate pop-up page I show three photographs of a forest with correct, no, and wrong shift (Olympus 35 mm shift on OM-4, tripod). Note the collapsing trees in the right shot. Processing and mounting slides For mounting the slides I prefer Gepe 7011 frames, glass-less mounts with a metal mask for razor sharp edges and square corners. The guide rails allow for precise positioning of the frame. They are rather expensive, particularly when bought in small quantities. 1'000 frames, however, are only approximately US$120. |
|||||||||||||||||||||||||||||||||||||||||||||||||||